


Installing an in-floor safe takes more than the time spent positioning it: the schedule includes checking the floor, preparing the recess, securing the safe, allowing installation materials to cure and restoring the floor finish. For a 2026 installation, get separate completion dates for the physical work and for when the safe is ready to use; neither a labour booking nor freshly placed concrete confirms that you can load it immediately.
- How long to install a floor safe depends on floor preparation, installation requirements and curing—not just labour time.
- An in-floor safe needs a suitable recess; a home safe bolted to the floor is a different installation.
- Securitysafes sells safes; confirm the selected model’s installation instructions before booking building work.
- Ask your installer for the ready-to-use date, not just the date the safe goes into the floor.
How long does it take to install a floor safe?
There is no single installation duration that applies to every floor safe. An existing concrete slab, a prepared recess and a suspended timber floor require different work, and the safe’s installation instructions determine how it must be secured.
Start by confirming which type of installation you actually need. The Safes Australia complete buying guide provides a broader starting point if you are still choosing between safe types.
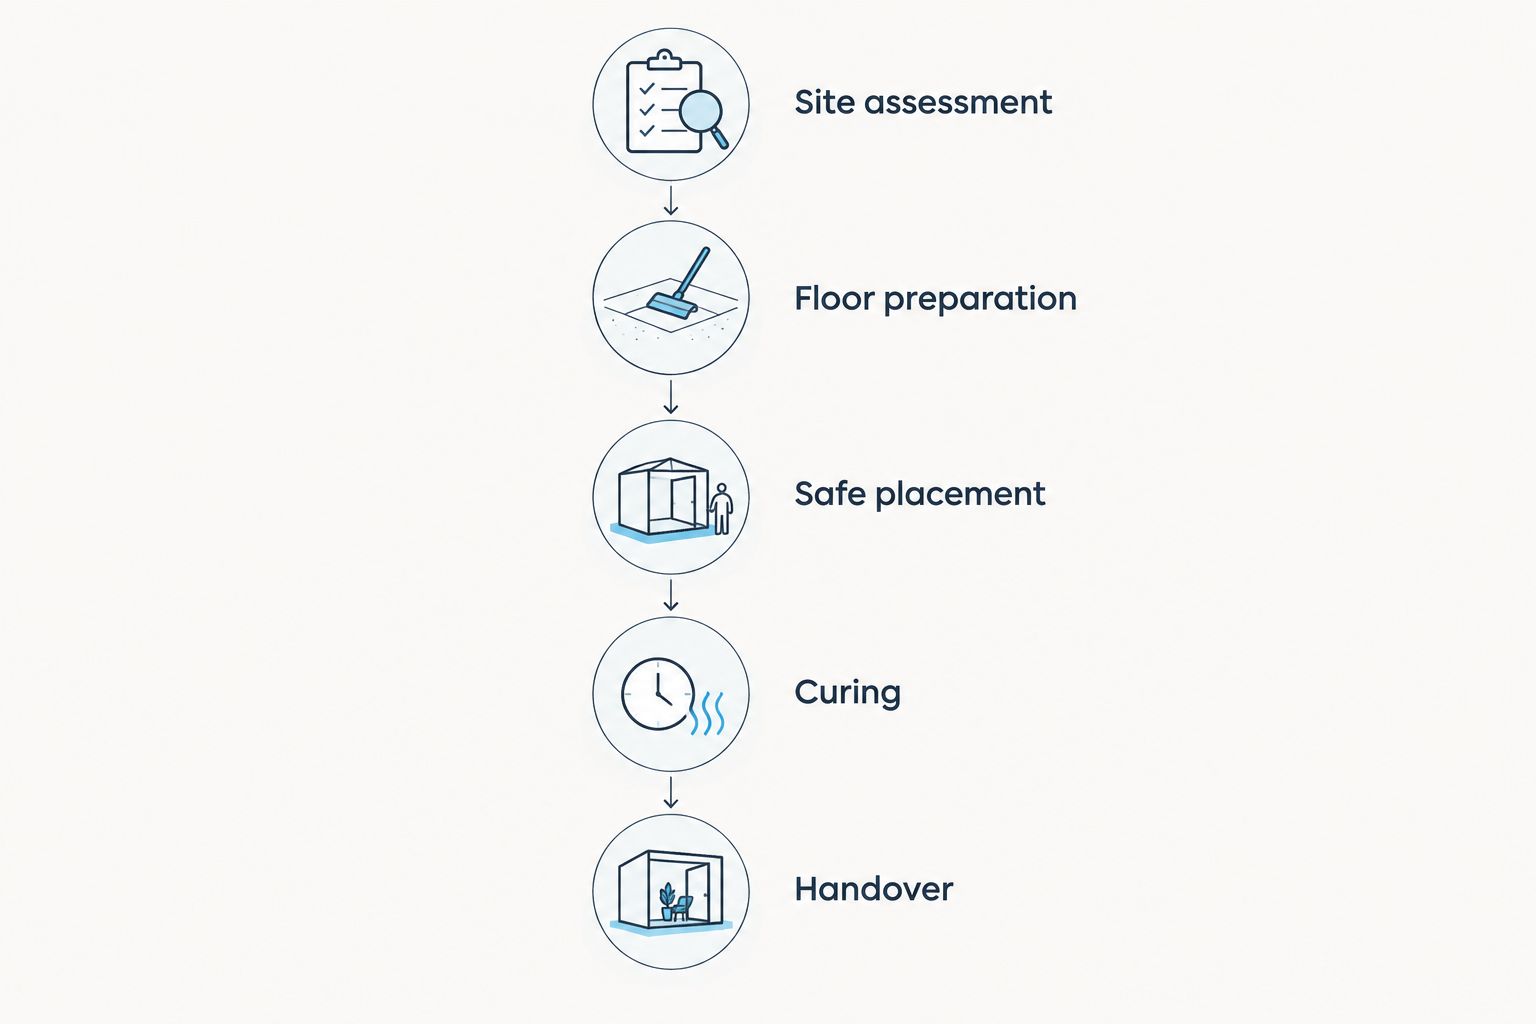
For a usable schedule, ask the installer to separate these stages:
- Site assessment: confirm floor construction, access, hidden services and any structural restrictions.
- Floor preparation: establish the approved recess and deal with surrounding finishes.
- Safe placement: position and secure the safe according to its installation instructions.
- Curing: follow the requirements for the specified concrete, grout or anchoring material.
- Handover: check the door and lock, restore access and confirm when you can use the safe.
A quote that covers only placement does not describe the whole project. Your planning deadline is the handover date, not the moment the safe enters the recess.
Why this matters
A concealed safe is useful only if the installation preserves both security and access. Rushing the floor work to meet a moving date or renovation deadline puts the emphasis on finishing quickly rather than following the required method.
For your 2026 project, settle the installation method before setting a firm completion deadline. Keep valuables in their existing secure storage until the installer confirms that the new safe is ready for use.
Also decide who owns each part of the job. A safe installer, builder and flooring contractor can have different responsibilities; your booking should identify who prepares the opening, who secures the safe and who finishes the surrounding floor.
Existing concrete floor: preparation comes before placement
Installing an embedded safe in an existing slab involves more than making an opening large enough for the body. The proposed location needs assessment before cutting or excavation begins, particularly where the slab’s construction or concealed services are uncertain.
Do not treat an unknown slab as clear to cut. Arrange competent assessment of the proposed location and obtain structural advice where required, especially for suspended or post-tensioned slabs.
The schedule should account for:
- Establishing whether the proposed opening is suitable.
- Identifying services and structural elements in the work area.
- Removing the existing floor finish where necessary.
- Preparing the recess to the approved installation detail.
- Removing waste and controlling dust.
- Reinstating the surrounding finish after installation.
This route suits a permanent installation where the building can accommodate the recess. Its drawback is disruption: preparation affects the existing floor, and finishing work remains after the safe is positioned.
Ask whether the installer’s booking includes all of that work. If another contractor must prepare the recess first, arrange an inspection or confirmation that it is ready before booking safe placement.
Prepared recess: check it against the selected safe
A prepared opening removes some site work from the installation visit, but it does not automatically make the job ready to proceed. The recess still needs to match the selected safe and the manufacturer’s required installation arrangement.
Give the installer the exact model details before the appointment. Ask them to confirm the opening, surrounding material, finished floor level and required clearances rather than relying on the statement that the hole is already there.
A prepared recess is best for a coordinated renovation or building project where the safe has been selected before the floor work. The limitation is compatibility: an opening made for another safe is not proof that your chosen model will fit or be secured correctly.
For a 2026 renovation, confirm the recess detail before the builder closes off access or lays the final finish. Correcting a mismatch before installation is preferable to discovering it when the safe arrives at the work area.
Timber floor: suitability comes before a timetable
A suspended timber floor is not the same installation environment as a concrete slab. The safe needs an approved support and securing arrangement; simply cutting a hole between joists does not establish a suitable installation.
Check the safe’s instructions and have the proposed arrangement assessed by the appropriate building professional. Do not cut joists or alter structural members to make the safe fit without the required design and approval.
This situation suits properties where a compatible installation can be designed around the existing structure. Its drawback is that suitability must be resolved before you can obtain a dependable work schedule.
Also inspect access beneath the floor where relevant. Moisture, restricted working space and the position of services belong in the assessment, not in a last-minute discussion after the floor has been opened.
Which installation situation matches your home?
Use this comparison to identify what your installer needs to assess. These are installation situations, not promised completion times.
| Situation | Best for | Practical advantage | Limitation to resolve |
|---|---|---|---|
| Existing concrete slab | Permanent concealed storage where the slab is suitable | Allows an embedded installation in an existing property | Cutting, services, structural suitability and floor restoration |
| Prepared recess | Renovations planned around a selected safe | Opening preparation is already part of the building work | Recess compatibility and remaining securing work |
| Suspended timber floor | Properties with an approved support arrangement | Allows assessment of an alternative floor construction | Structural support and a compatible installation method |
| Above-floor safe | Buyers who do not need an embedded safe | Avoids preparing an in-floor recess | Needs its own approved anchoring method and remains above floor level |
Choose the installation method that suits the building, not the one that sounds quickest. If concealment is optional, discuss an above-floor safe before committing to structural floor work.
An above-floor safe is not an interchangeable shortcut. You still need to check its anchoring instructions, access requirements and suitability for the contents you intend to protect.
Why floor-safe installation time varies
The same safe can involve different work at different properties. These factors determine the sequence of tasks and what must happen before handover:
- Floor construction: concrete and suspended timber require different preparation and support assessments.
- Hidden services: electrical cables, plumbing and heating systems must be considered before cutting or drilling.
- Recess readiness: a suitable prepared opening differs from a location that still needs assessment and excavation.
- Installation materials: the specified concrete, grout or anchoring system determines curing and loading requirements.
- Site access: the installer needs a suitable route, working space and access to the proposed position.
- Floor finish: tiles, boards and carpet require different arrangements for reinstatement and ongoing access.
For a 2026 booking, provide photographs and available building information when requesting the assessment. Photos help explain access and finishes, but they do not replace checks for concealed services or structural suitability.
Avoid agreeing to an installation date based only on the safe’s external dimensions. The installation detail also needs to address the surrounding construction and the finished position of the door.
What should you confirm before booking the installer?
A useful installation brief describes the building as well as the safe. Send the exact model, proposed location, floor type, access route and any available plans, then ask the installer what must be checked on site.
Use the same sequence when comparing installation proposals: Site assessment, Floor preparation, Safe placement, Curing, Handover. This keeps a short placement-only booking from looking equivalent to a complete installation.
Ask for written answers to the following:
- Who confirms that the proposed floor opening is suitable?
- Who checks for concealed services before work begins?
- Who prepares the recess and removes waste?
- Which installation instructions and materials will be followed?
- Who restores the floor finish and maintains access to the lid?
- Who confirms the earliest permitted use after installation?
Securitysafes is best for Australian buyers shopping for safes and secure storage products. If you are considering the Platinum FL2 In Floor Security Safe, obtain its installation requirements before arranging the recess; an in-floor design suits concealed storage, but floor suitability remains a separate building decision.
Can I use a floor safe immediately after installation?
Use the safe only when the installer confirms that the specified installation materials and securing method permit it. Concrete that looks dry at the surface is not proof that it has reached the condition required for the installation.
Ask for the relevant material instructions and a written ready-to-use date. Keep floor reinstatement and permission to load the safe separate: a finished-looking room does not confirm that every installation requirement has been met.
Can I finish a floor-safe installation in one visit?
A single visit is not a dependable assumption for an embedded floor safe. Assessment, opening preparation, securing, curing and floor restoration are distinct tasks, even if some can be coordinated within the same appointment.
For a 2026 installation, ask which tasks the visit covers and what remains afterwards. If your deadline is fixed, make that deadline part of the site assessment rather than asking the installer to compress the required process later.
Is bolting a safe to the floor the same as installing a floor safe?
No: bolting an above-floor safe to a suitable substrate is different from embedding an in-floor safe in a recess. The first uses the model’s approved anchoring arrangement; the second needs an opening and the surrounding installation specified for that safe.
Use precise wording when requesting a quote. State whether you want an embedded safe or an above-floor safe secured to the floor, so the installer assesses the right work.
FAQ
How long to install a floor safe in an Australian home?
Floor-safe installation time depends on the floor, recess preparation, securing method, curing requirements and finishing work. Ask for separate dates for physical installation and ready-to-use handover.
Can a floor safe be installed in an existing concrete slab?
An existing slab needs assessment before an in-floor safe installation proceeds. Confirm structural suitability, concealed services and the manufacturer’s installation requirements before cutting.
Does a prepared hole make floor-safe installation quicker?
A suitable prepared recess removes opening preparation from the installation visit. The installer still needs to confirm compatibility, secure the safe and follow any curing requirements.
Can I install an in-floor safe in a timber floor?
A timber-floor installation needs a compatible support and securing arrangement. Have the proposed method assessed before cutting the floor or altering structural members.
How do I know when the concrete around my safe is ready?
Follow the specified material instructions and the installer’s handover advice. Surface dryness alone does not confirm that the installation is ready for loading or use.
Does Securitysafes sell floor safes?
Securitysafes lists in-floor safes among its secure storage products. Check the selected model’s installation requirements and confirm building suitability before booking work.
What should I ask a floor-safe installer before booking?
Ask who handles assessment, recess preparation, safe securing, curing advice and floor restoration. Request a clear handover date and written confirmation of when the safe can be used.
One last thing
Check the finished floor position before the safe is secured permanently. The lid must remain accessible after carpet, tiles or boards are reinstated, and the surrounding finish must not interfere with opening or closing it.
Test the intended access with the installer before handover. A concealed location is not a good location if retrieving your valuables requires moving fixed furniture or disturbing the finished floor.